Security Scan and Performance Test
Code Security Scan Stage
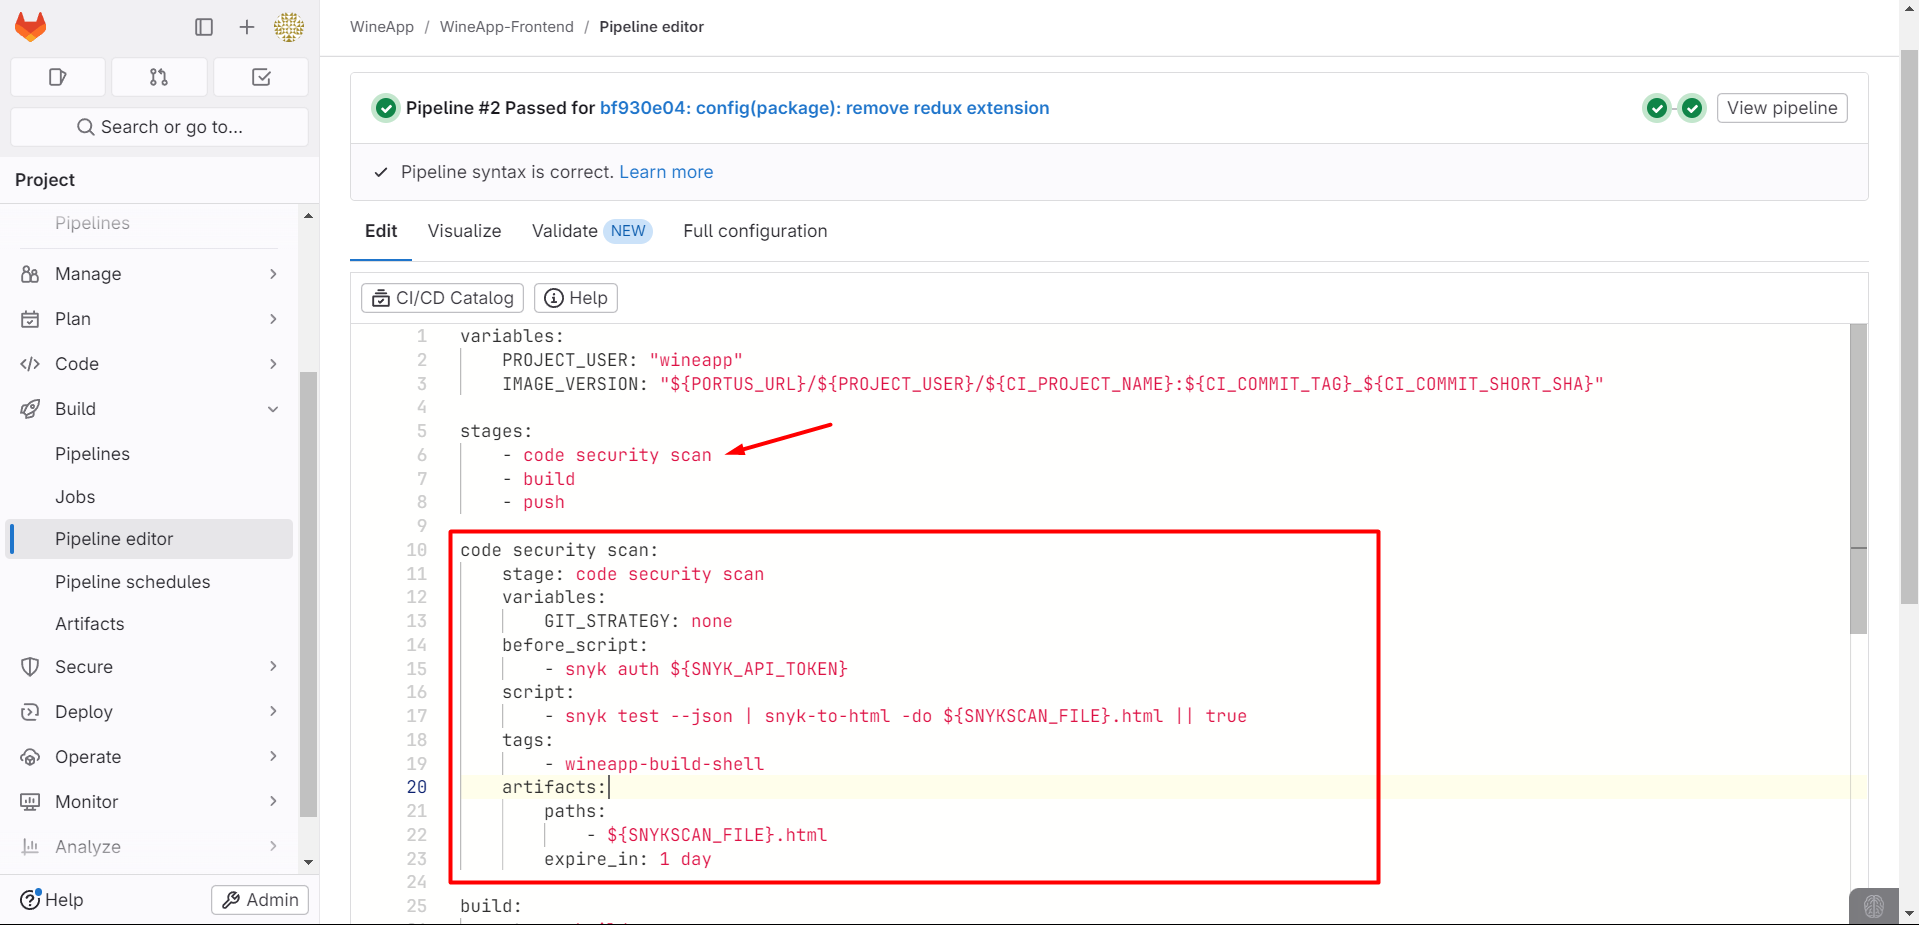
After setting up the build and pushing the image, we will add a Stage to scan the Source Code for security.
snykscan:
    stage: snykscan
    variables:
        GIT_STRATEGY: clone
    before_script:
        - snyk auth ${SNYK_API_TOKEN}
    script:
        - snyk test --json | snyk-to-html -do ${SNYKSCAN_FILE}.html || true
    tags:
        - wineapp-build-shell
    artifacts:
        paths:
            - ${SNYKSCAN_FILE}.html
        expire_in: 1 day
In GitLab CI/CD, artifacts are files or directories that are saved from a job after that job has finished executing.
Artifacts are often used to store the results of the build, testing processes, or other important information that you want to keep and use in other jobs in the pipeline.
paths:
- ${SNYKSCAN_FILE}.html
- Defines the artifact files that the job will save after execution. In this case, the HTML file contains the results of the security scan.
expire_in: 1 day - Sets the lifespan of the artifact to 1 day. After this period, the artifact will be deleted.
We will proceed to add this Stage to .gitlab-ci.yml.
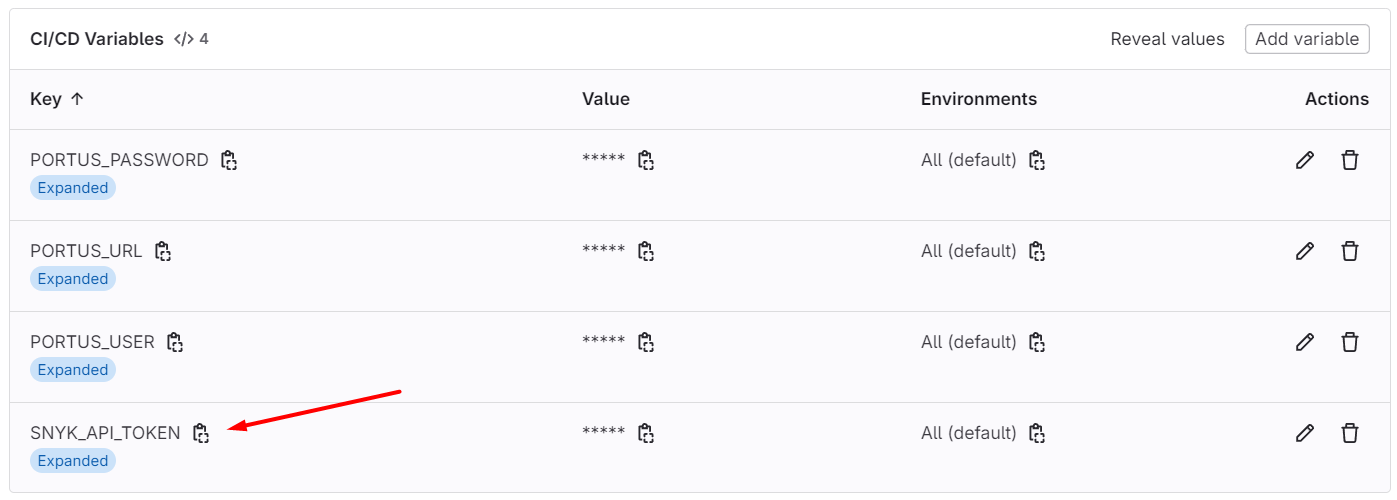
Note to create Variables such as SNYKSCAN_FILE and SNYK_API_TOKEN.
SNYKSCAN_FILE: "SNYK_SECURITY_SCAN_${CI_PROJECT_NAME}_${CI_COMMIT_TAG}_${CI_COMMIT_SHORT_SHA}"
We will create a tag, and the pipeline will start.
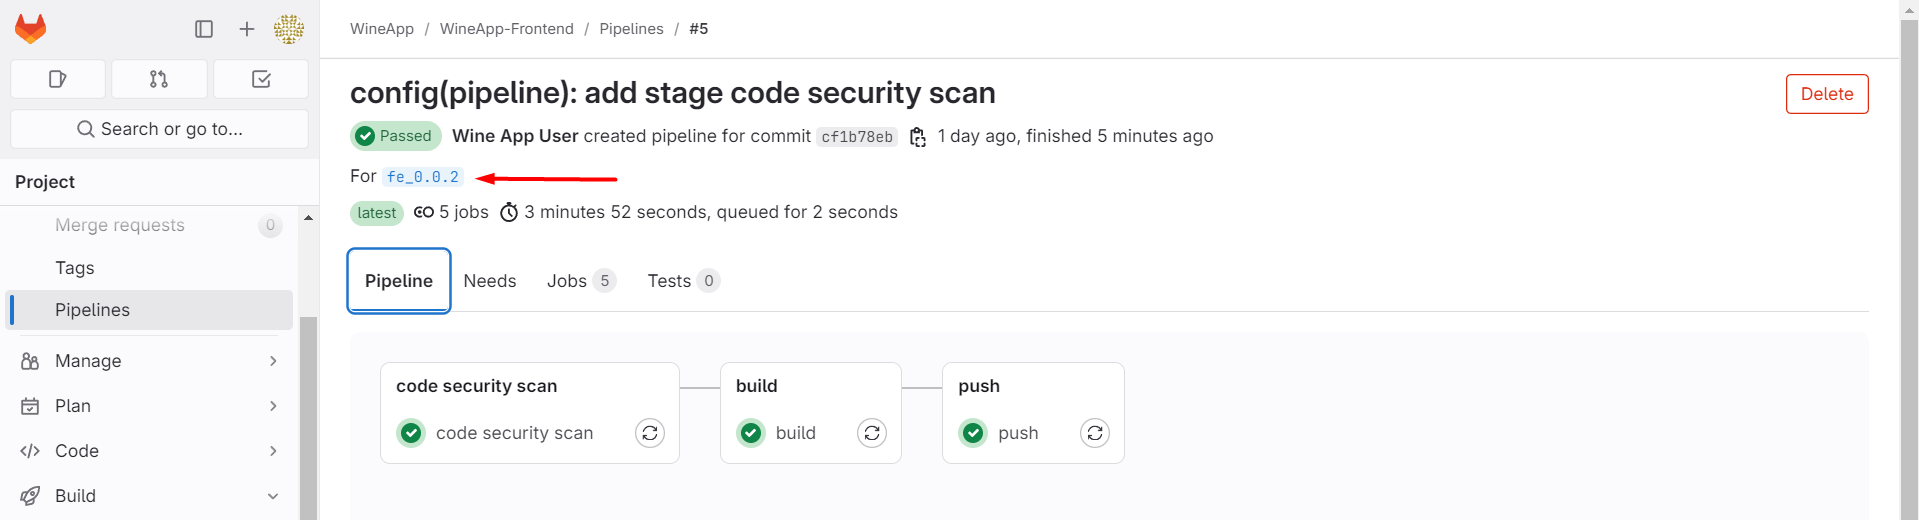
After successfully running the pipeline, a new stage called Code Security Scan will be added, and there will be a detailed test report file available for download here:
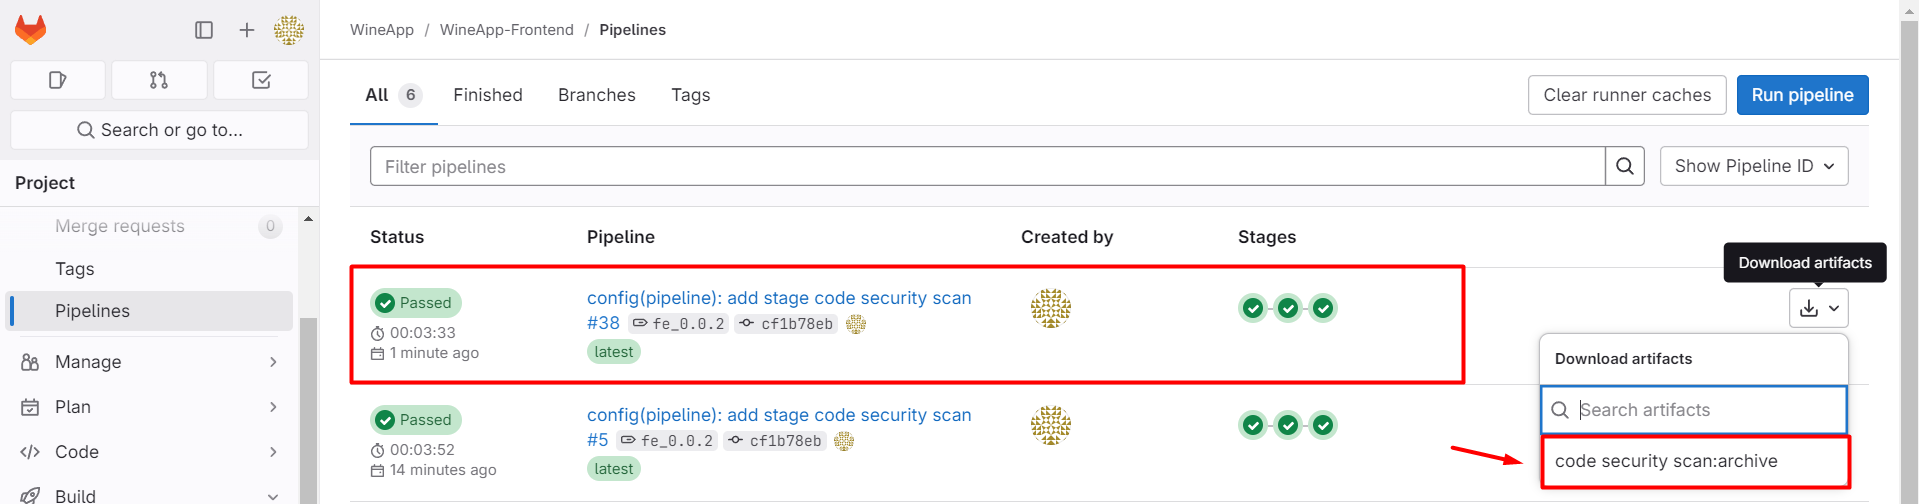
Alternatively, you can access the Artifacts section:
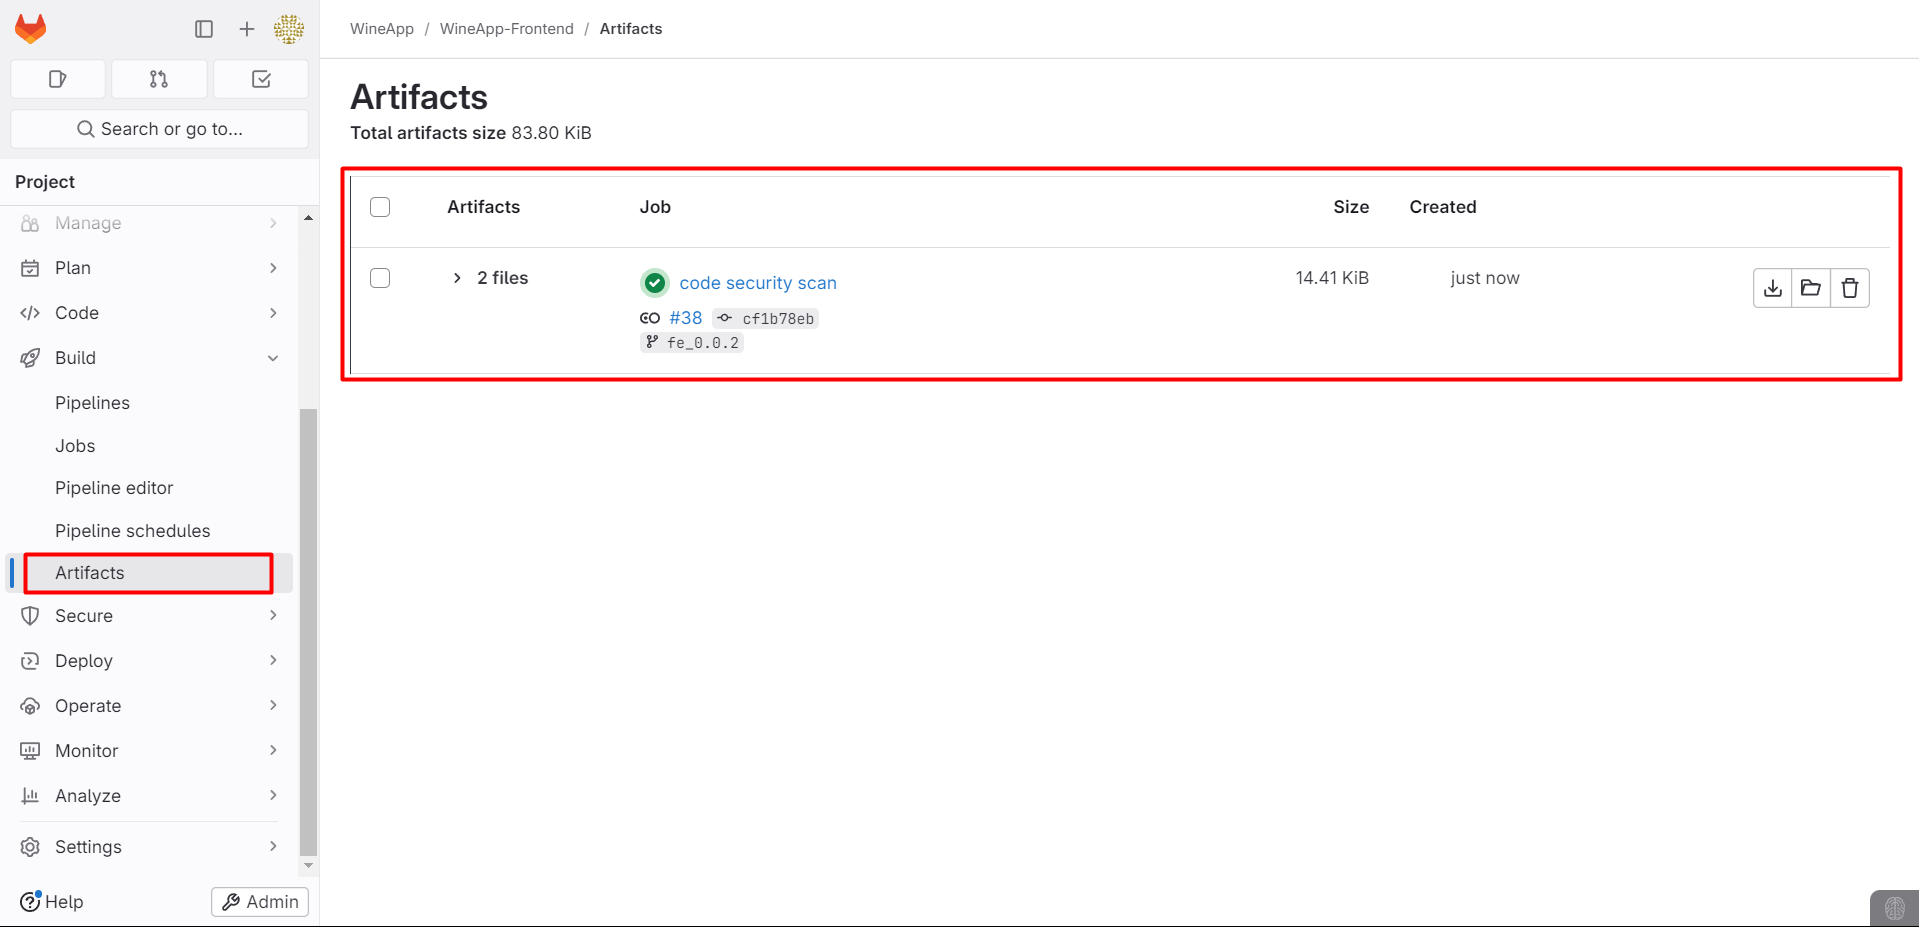
After downloading, extract the file and check the report in HTML format.

Scan Image Stage
The security scan of the image will be performed right after we successfully build the image.
We will add a stage to scan the image for vulnerabilities:
trivy scan image:
    stage: trivy scan image
    variables:
        GIT_STRATEGY: none
    script:
        - docker run --rm -v $(pwd):/wineapp-frontend -v /var/run/docker.sock:/var/run/docker.sock aquasec/trivy clean --all
        - docker run --rm -v $(pwd):/${CI_PROJECT_NAME} -v /var/run/docker.sock:/var/run/docker.sock aquasec/trivy image --format template --template "@contrib/html.tpl" --output /${CI_PROJECT_NAME}/${TRIVY_IMAGE_REPORT}.html ${IMAGE_VERSION}
    tags:
        - wineapp-build-shell
    only:
        - tags
    artifacts:
        paths:
        - ${TRIVYFS_REPORT}.html
        expire_in: 1 day
Create a variable to define the name of the report file:
TRIVY_IMAGE_REPORT: "TRIVYFS_SCAN_IMAGE_REPORT_${CI_PROJECT_NAME}_${CI_COMMIT_TAG}_${CI_COMMIT_SHORT_SHA}"
In this stage, we have two parts, both using the Trivy tool to scan for vulnerabilities in a Docker image.
Part 1: Clean all Trivy temporary data to prepare for a new scan.
docker run --rm: Runs a Docker container and automatically removes it after the task is completed.-v $(pwd):/wineapp-frontend: Mounts the current directory ($(pwd)) to the /wineapp-frontend path inside the container.-v /var/run/docker.sock:/var/run/docker.sock: Mounts the Docker socket from the host into the container, allowing the container to perform Docker-related operations.aquasec/trivy clean --all: Uses Trivy’s clean command to remove all temporary or old data created during previous scans.
Part 2: Scan the Docker image for vulnerabilities, generate a report in HTML format, and save it in the artifacts section.
aquasec/trivy image: Uses Trivy’s image command to scan the Docker image we just created for vulnerabilities.--format template: Specifies the output format as a template.--template "@contrib/html.tpl": Uses the HTML template file (html.tpl) to format the scan results.--output /${CI_PROJECT_NAME}/${TRIVY_IMAGE_REPORT}.html: Specifies the path and filename for the HTML report. The report will be saved in the project directory, with the filename depending on the value of ${TRIVY_IMAGE_REPORT}.
Add the stage to the configuration file, create a tag, and check the pipeline:
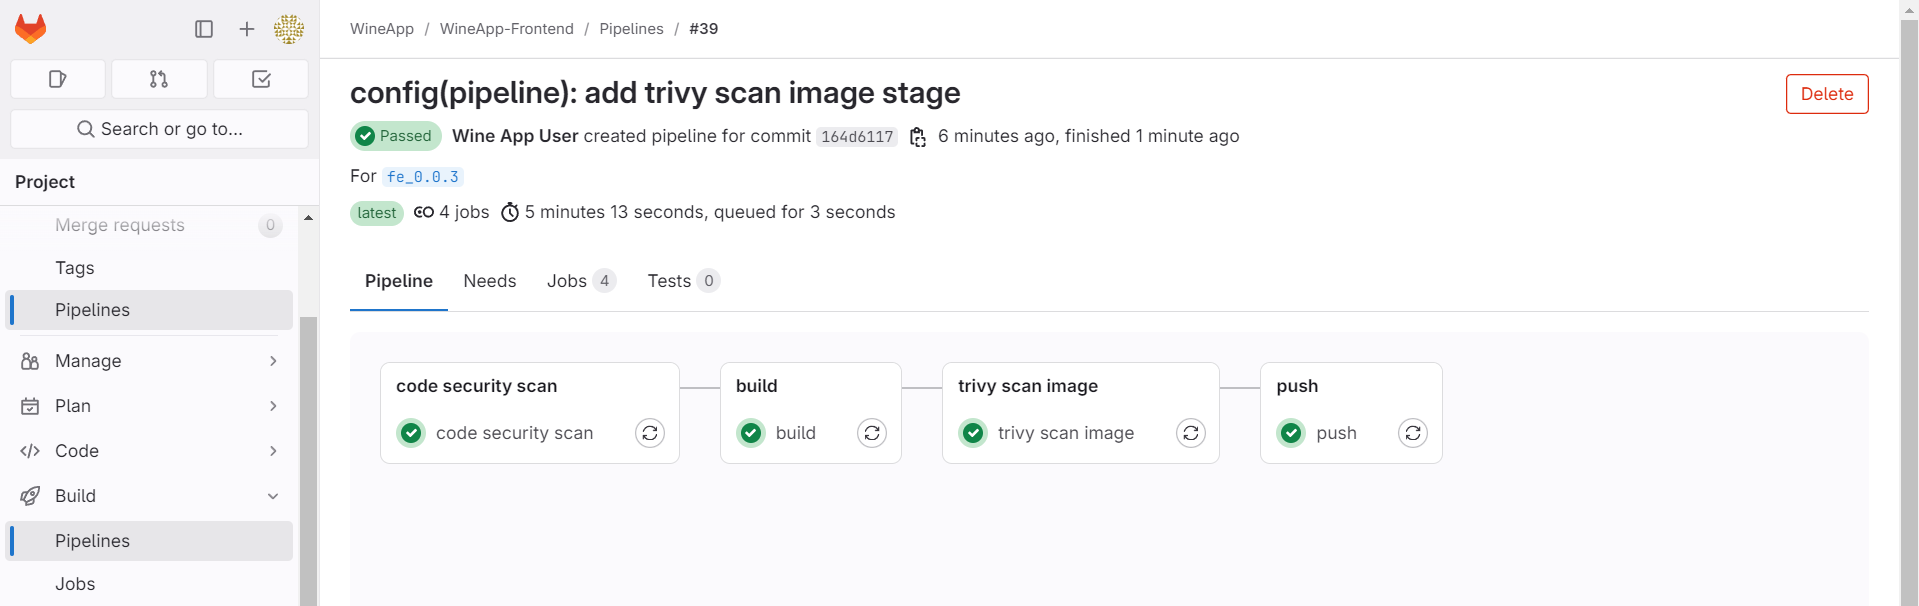
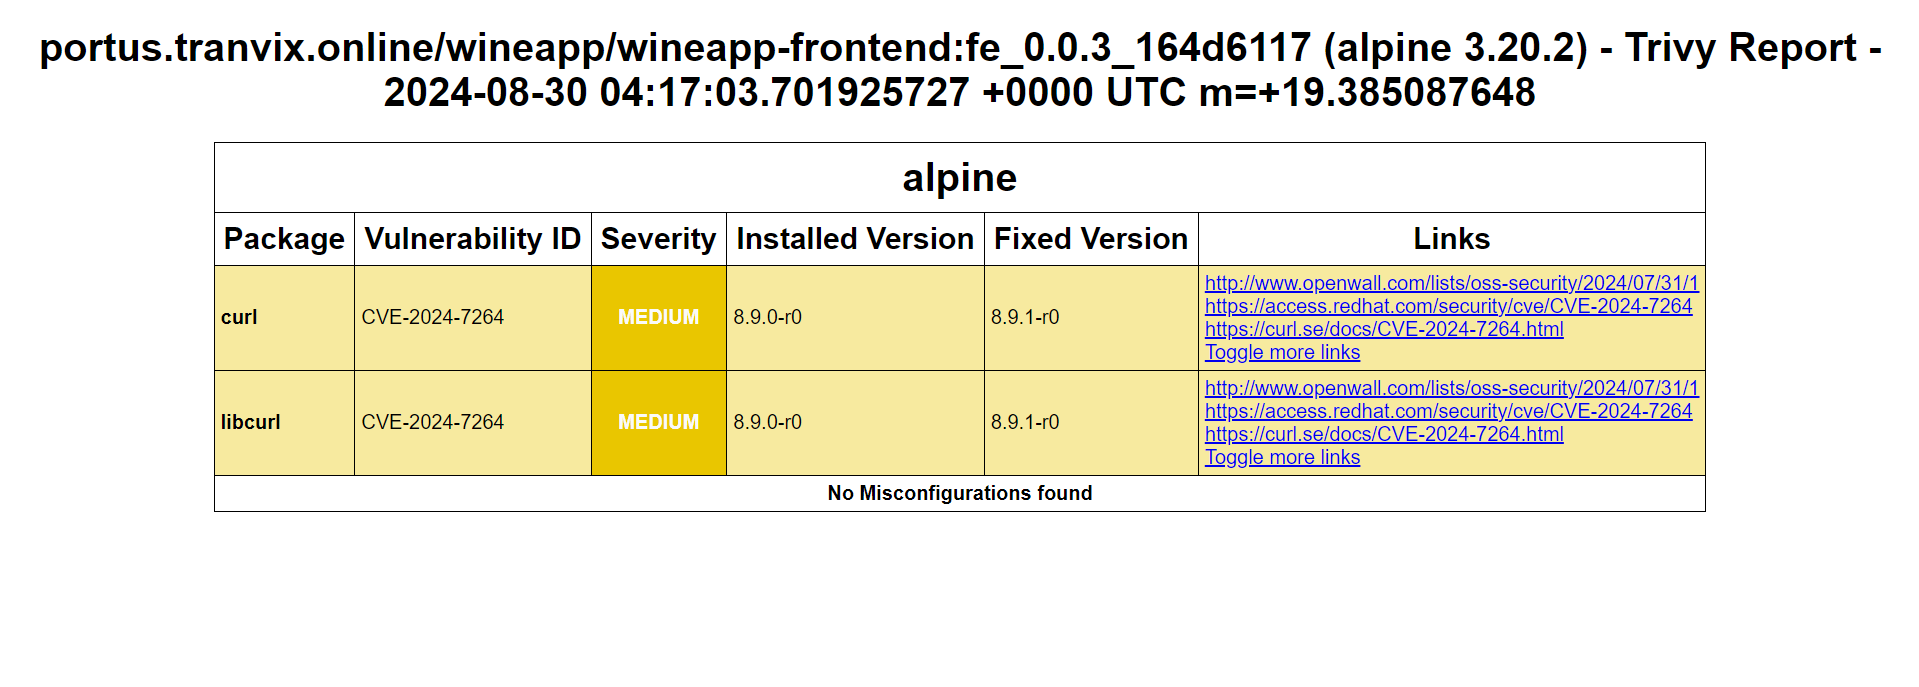
After the pipeline runs successfully, check the Artifacts section to download the report file from the image security scan stage.
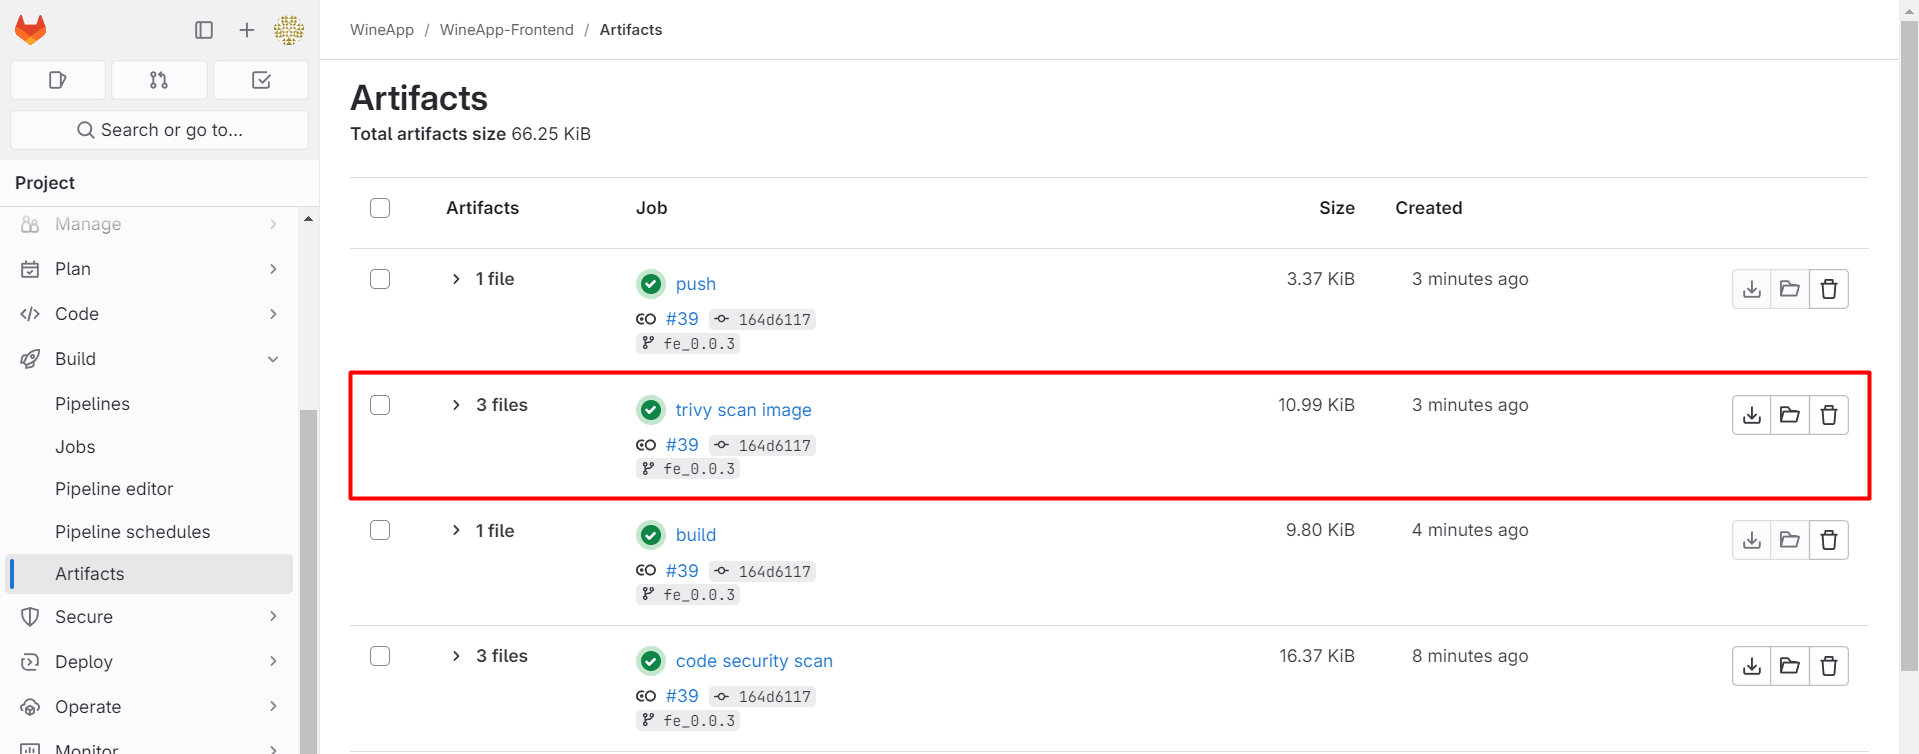
Check the report file:
Deploy the Project
We have completed the testing and verification steps before deploying the project. In this section, we will deploy the front-end project.
We will deploy the project to the development server.
deploy:
    stage: deploy
    variables:
        GIT_STRATEGY: none
    before_script:
        - docker login -u ${PORTUS_USER} -p ${PORTUS_PASSWORD} ${PORTUS_URL}
    script:
        - sudo su ${PROJECT_USER} -c "docker pull ${IMAGE_VERSION}; docker rm -f ${CI_PROJECT_NAME}; docker run --name ${CI_PROJECT_NAME} -dp ${FE_PORT} ${IMAGE_VERSION}"
    after_script:
        - docker logout ${PORTUS_URL}
    tags:
        - wineapp-dev-shell
    only:
        - tags
In the tags section, we will set it to wineapp-dev-shell because this is the GitLab-Runner tag configured on the development server.
We will create the variable FE_PORT with the value 3000:80, meaning that when you access http://<ip_server_dev>:3000, this request will be forwarded to port 80 of the container, where the application inside the container will handle the request.
The deploy job is an automated deployment step in the GitLab CI/CD pipeline.
It performs Docker-related operations to pull the Docker image we pushed, stop the current container, and restart the container with the new version of the application.
Everything is done under a specific user’s (PROJECT_USER) permissions to ensure security and role management.
Note:
In the script section, we use the
sudo sucommand to switch users. Normally, when using this command, you would need to enter a password. However, during the pipeline run, there is no way to manually input a password.Therefore, to avoid this, we will configure the GitLab Runner user to run the
sudo sucommand without needing to enter a password.On the command line interface, you need to enter the
sudo visudocommand and provide your password. Then, add the following line to the configuration file to complete the setup:gitlab-runner ALL=(ALL) NOPASSWD: /bin/su
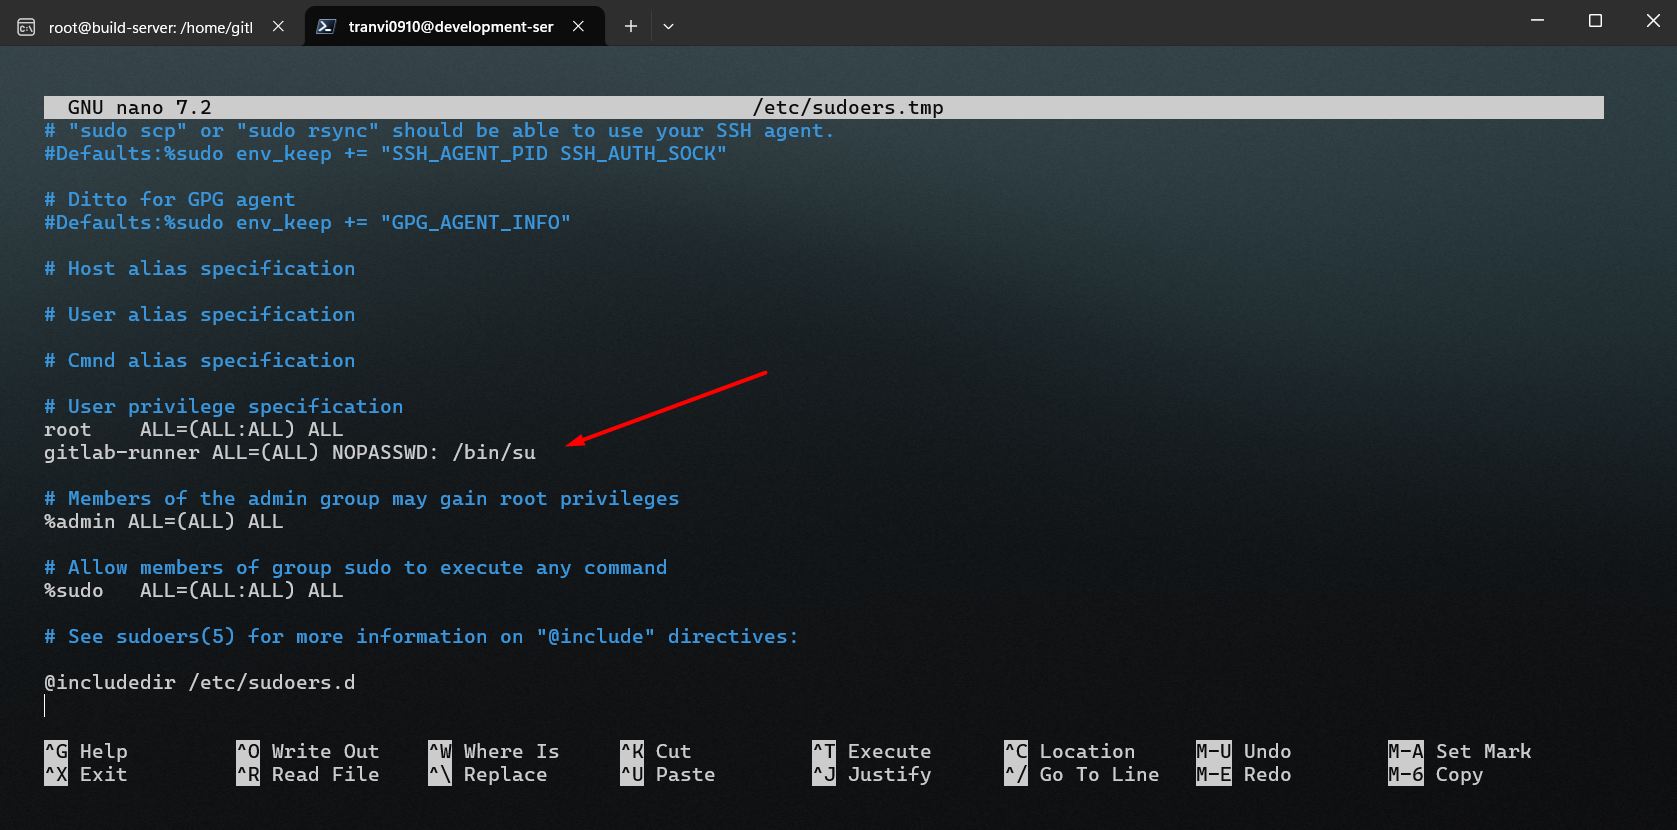
To save the file, press F2 + Y + Enter.
After configuring, we will add the stage to the pipeline and create a tag.
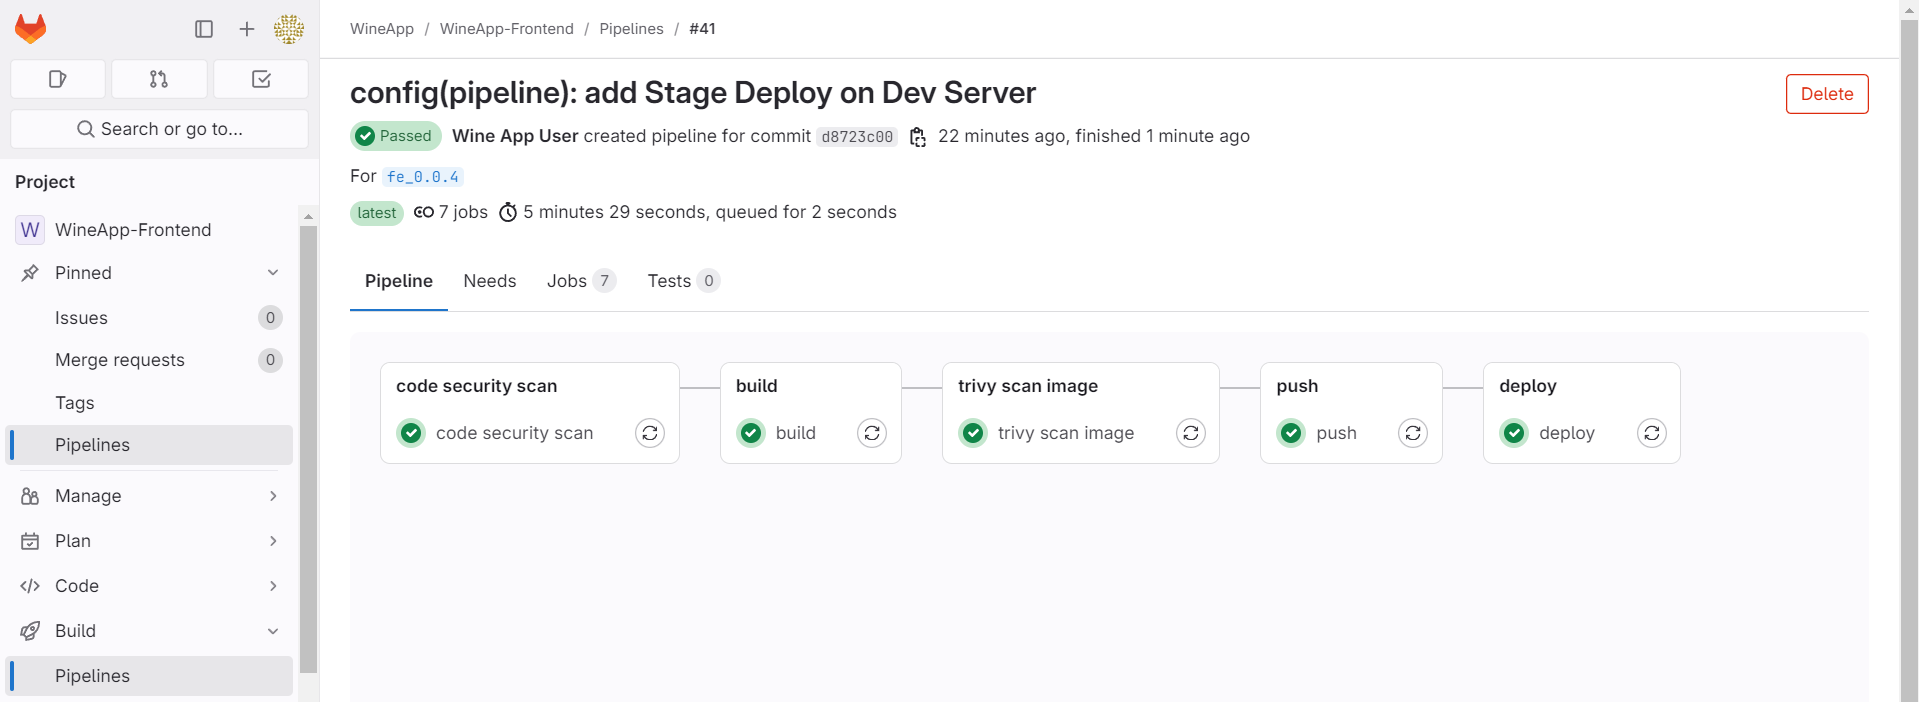
Now that the pipeline has run successfully, proceed to check at the following address:
192.168.181.102:3000
192.168.181.102is the IP of the development server where we deployed the application.3000is the port used to run the application, which was declared when we ran the container.

The web has been successfully deployed. We can check the container by running the following command:
docker container ps

Website Security Scan - Arachni
After the deployment step, we will proceed to perform a security test of the web application we just deployed.
We will set up Arachni as described in Section 2.7.
-
security scan website:
stage: security scan website
variables:
    ARACHNI_USER: "arachni"
    PATH_TO_ARACHNI_VERSION: "/home/arachni/arachni-1.6.1.3-0.6.1.1/"
    GIT_STRATEGY: none
script:
    - sudo su ${ARACHNI_USER} -c "cd ${PATH_TO_ARACHNI_VERSION}; bin/arachni --output-verbose --scope-include-subdomains ${ADDRESS_FRONTEND} --report-save-path=/tmp/${ARACHNI_WEBSITE_REPORT}.afr > /dev/null 2>&1"
    - sudo su ${ARACHNI_USER} -c "cd ${PATH_TO_ARACHNI_VERSION}; bin/arachni_reporter /tmp/${ARACHNI_WEBSITE_REPORT}.afr --reporter=html:outfile=/tmp/${ARACHNI_WEBSITE_REPORT}.html.zip"
    - sudo chmod 777 /tmp/${ARACHNI_WEBSITE_REPORT}.html.zip
    - cp /tmp/${ARACHNI_WEBSITE_REPORT}.html.zip .
tags:
    - wineapp-dev-shell
artifacts:
    paths:
        - ${ARACHNI_WEBSITE_REPORT}.html.zip
    expire_in: 1 day
only:
    - tags
The security scan website job performs a security scan on a website, generates a security report, and saves it as a .zip file so you can download it after the pipeline completes.
ADDRESS_FRONTEND is the address of the website we just deployed.
ARACHNI_WEBSITE_REPORT is the name file report.
When executing the sudo chmod command, you are also required to enter a password, so you need to configure it as shown above.
gitlab-runner ALL=(ALL) NOPASSWD: /bin/chmod
Add a Stage to the Pipeline and create the necessary Variables, then create a tag and check the Pipeline.
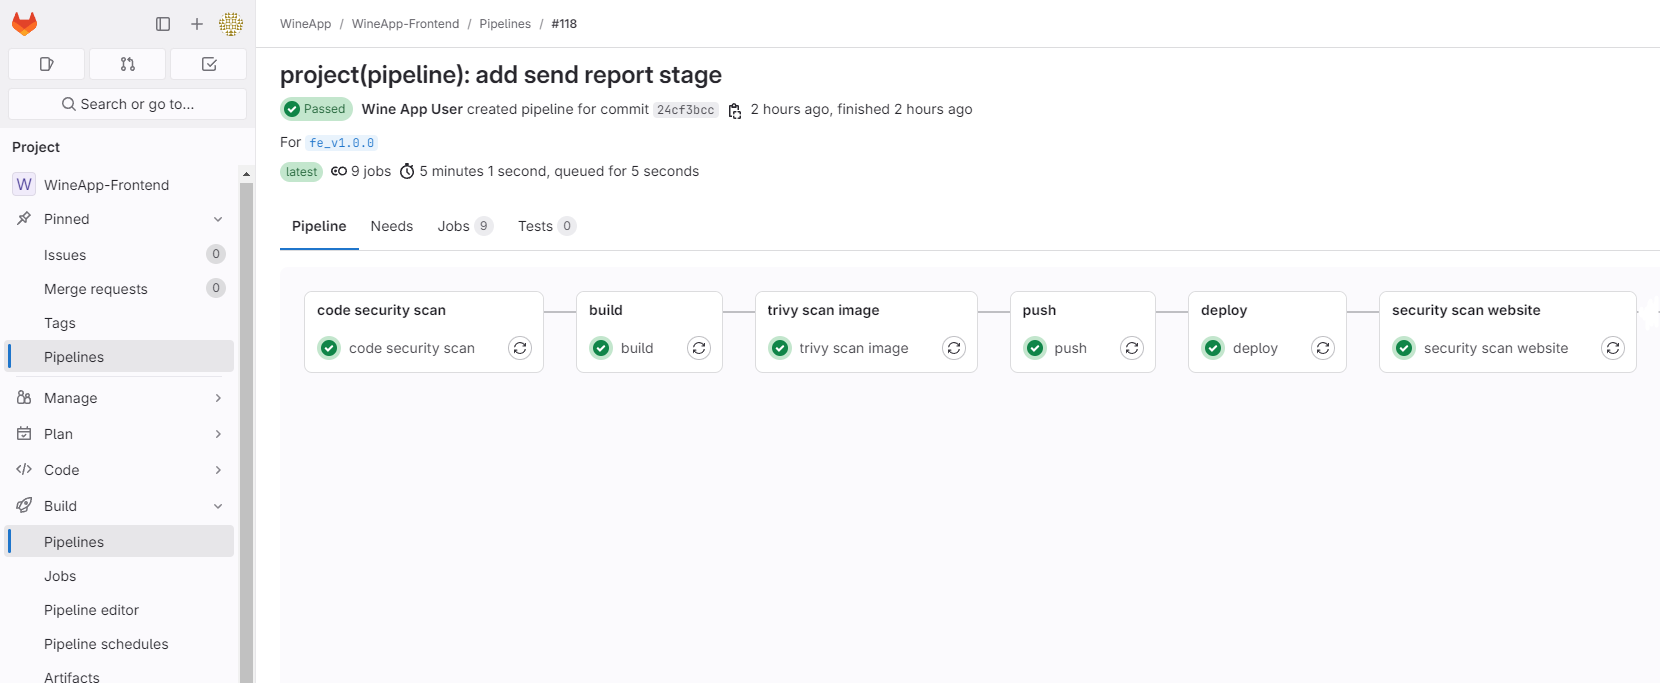
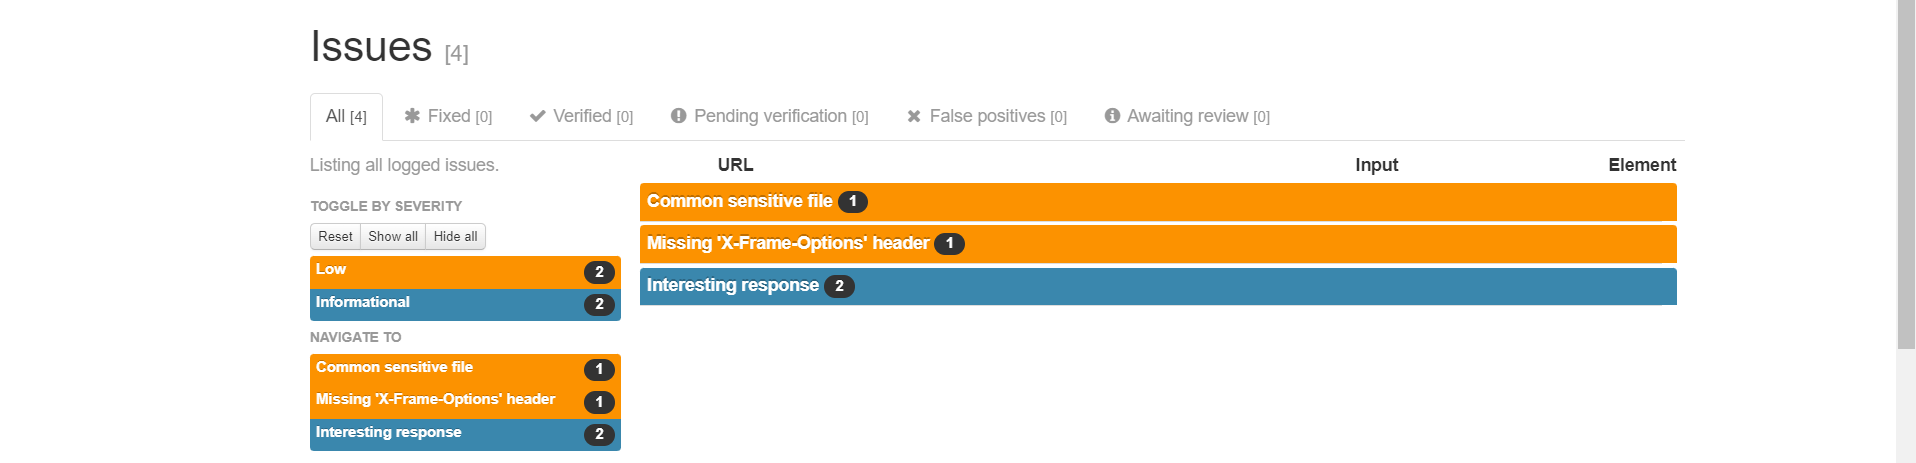
You will get a Report as follows:
Performance Test - k6
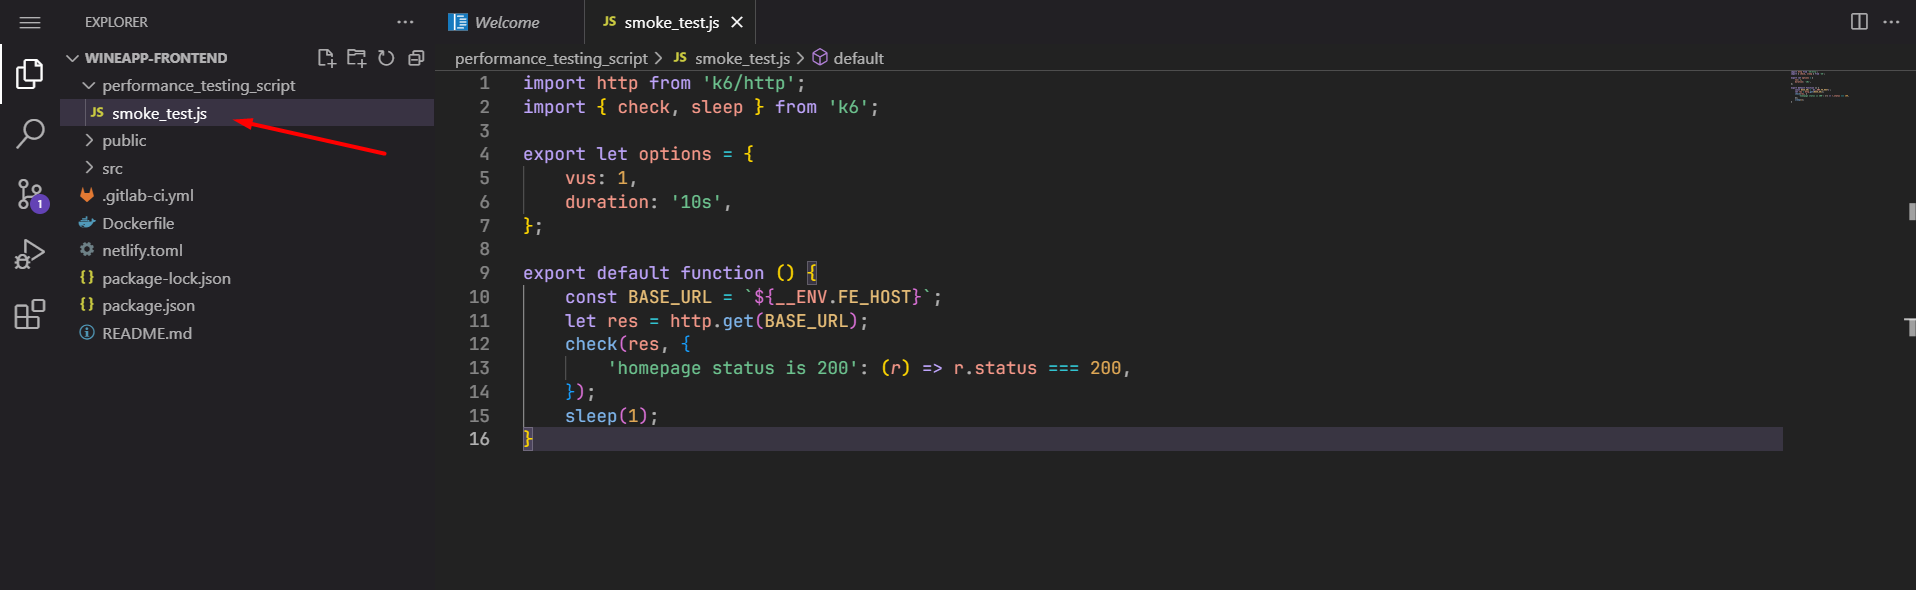
To test the performance of the website with k6, we will create a test file written in JavaScript.
import http from 'k6/http';
import { check, sleep } from 'k6';

export let options = {
    vus: 1,
    duration: '10s',
};

export default function () {
    const BASE_URL = `${__ENV.FE_HOST}`;
    let res = http.get(BASE_URL);
    check(res, {
        'homepage status is 200': (r) => r.status === 200,
    });
    sleep(1);
}
Then we will add the test file to the repository containing the code.
Add Stage to Pipeline:
performance testing:
    stage: performance testing
    variables:
        GIT_STRATEGY: none
        SCRIPT_PATH: performance_testing_script
    script:
        - sudo chmod -R 754 ./${SCRIPT_PATH}
        - docker run --user ${ID_USER_GITLAB_RUNNER}:${ID_GROUP_GITLAB_RUNNER} --rm -v $(pwd)/${SCRIPT_PATH}:/${SCRIPT_PATH} grafana/k6 run -e FE_HOST=${FE_HOST} --summary-export=/${SCRIPT_PATH}/summary_perf.json /${SCRIPT_PATH}/smoke_test.js
        - docker run --user ${ID_USER_GITLAB_RUNNER}:${ID_GROUP_GITLAB_RUNNER} --rm -v $(pwd)/${SCRIPT_PATH}:/${SCRIPT_PATH} grafana/k6 run -e FE_HOST=${FE_HOST} /${SCRIPT_PATH}/smoke_test.js
        - mv ./${SCRIPT_PATH}/summary.html $(pwd)/${K6_PERFORMANCE_TEST_REPORT}.html
        - cat ./${SCRIPT_PATH}/summary_perf.json | jq -r '["metric", "avg", "min", "med", "max", "p(90)", "p(95)"], (.metrics | to_entries[] | [.key, .value.avg, .value.min, .value.med, .value.max, .value["p(90)"], .value["p(95)"]]) | @csv' > ${K6_PERFORMANCE_TEST_REPORT}.csv
    after_script:
        - sudo chown -R gitlab-runner $(pwd)
    tags:
        - wineapp-dev-shell
    artifacts:
        paths:
            - ${K6_PERFORMANCE_TEST_REPORT}.html
            - ${K6_PERFORMANCE_TEST_REPORT}.csv
        expire_in: 1 day
    only:
        - tags
The performance testing job in GitLab CI/CD is designed to perform performance testing for the project using the k6 tool.
The Docker container is run under the GitLab Runner user via the variables ID_USER_GITLAB_RUNNER and ID_GROUP_GITLAB_RUNNER.
A Docker container with k6 is started to perform testing based on the smoke_test.js script. The test results are output as a JSON file summary_perf.json. The results are then moved and converted into HTML and CSV files and stored in artifacts.
After the Pipeline runs successfully, you will get a report file in HTML format.


          /\      |‾‾| /‾‾/   /‾‾/
     /\  /  \     |  |/  /   /  /
    /  \/    \    |     (   /   ‾‾\
   /          \   |  |\  \ |  (‾)  |
  / __________ \  |__| \__\ \_____/ .io

     execution: local
        script: performance_testing_script/smoke_test.js
        output: -

     scenarios: (100.00%) 1 scenario, 1 max VUs, 40s max duration (incl. graceful stop):
              * default: 1 looping VUs for 10s (gracefulStop: 30s)


     ✓ homepage status is 200

     checks.........................: 100.00% ✓ 10       ✗ 0
     data_received..................: 8.1 kB  808 B/s
     data_sent......................: 860 B   86 B/s
     http_req_blocked...............: avg=240.69µs min=3.15µs   med=4.21µs   max=2.36ms   p(90)=241.93µs p(95)=1.3ms
     http_req_connecting............: avg=124.41µs min=0s       med=0s       max=1.24ms   p(90)=124.41µs p(95)=684.3µs
     http_req_duration..............: avg=512.44µs min=318.21µs med=491.68µs max=679.04µs p(90)=652.66µs p(95)=665.85µs
       { expected_response:true }...: avg=512.44µs min=318.21µs med=491.68µs max=679.04µs p(90)=652.66µs p(95)=665.85µs
     http_req_failed................: 0.00%   ✓ 0        ✗ 10
     http_req_receiving.............: avg=90.44µs  min=38.49µs  med=87.98µs  max=129.07µs p(90)=128.62µs p(95)=128.84µs
     http_req_sending...............: avg=47.97µs  min=15.66µs  med=17.02µs  max=305.24µs p(90)=64.64µs  p(95)=184.94µs
     http_req_tls_handshaking.......: avg=0s       min=0s       med=0s       max=0s       p(90)=0s       p(95)=0s
     http_req_waiting...............: avg=374.02µs min=229.34µs med=365.44µs max=529.58µs p(90)=519.81µs p(95)=524.69µs
     http_reqs......................: 10      0.998173/s
     iteration_duration.............: avg=1s       min=1s       med=1s       max=1s       p(90)=1s       p(95)=1s
     iterations.....................: 10      0.998173/s
     vus............................: 1       min=1      max=1
     vus_max........................: 1       min=1      max=1


running (10.0s), 0/1 VUs, 10 complete and 0 interrupted iterations
default ✓ [======================================] 1 VUs  10s